Create a Workflow
To create a workflow, follow the steps below.
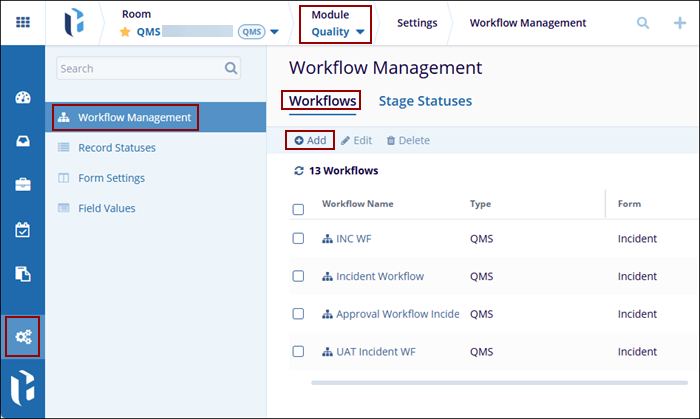
- From the Quality module, click on the Settings menu > Workflow Management > Workflows tab.
- Click on the +Add button.
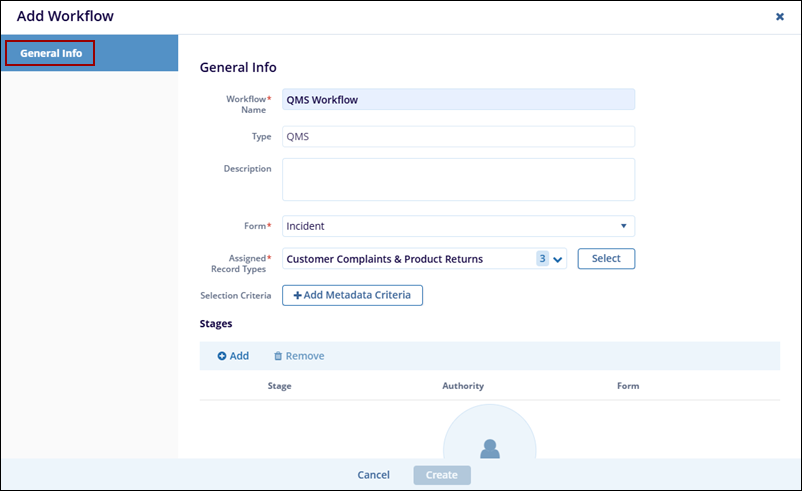
- On the ‘Add Workflow’ form, fill in the following
details in the ‘General Info’ section.
- Workflow Name*: Provide a name for the workflow.
- Type: The workflow type ‘QMS’ is auto-populated and non-editable.
- Description: Optionally add a suitable description for the workflow.
- Form*: Select any one of the forms, i.e., Incident, CAPA, Action Item, etc.
-
Assigned Record Types*: Select one or multiple
record types as per requirements. The ‘Assigned Record
Types’ dropdown displays options based on the form selected.
- In the ‘Stages’ section, click on
the +Add button and add the required number of
stages to the workflow.
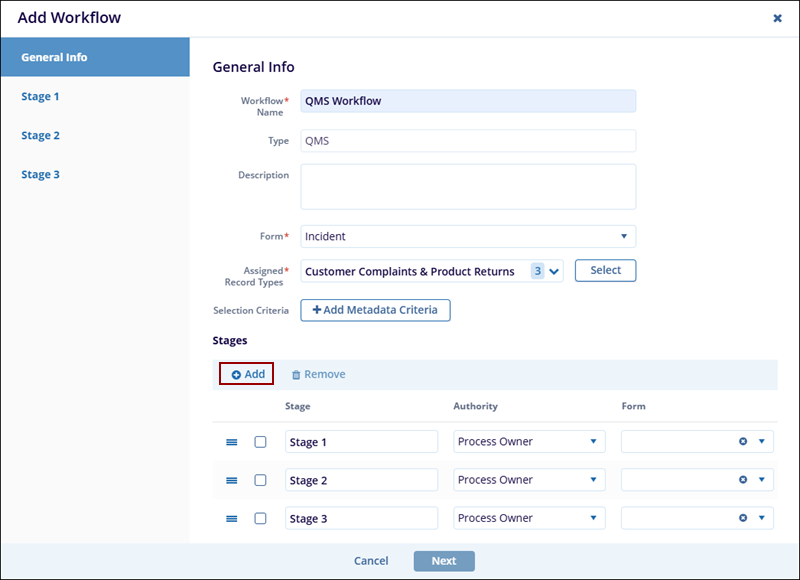
- Rename each stage, associate an authority with the stage,
select the form type, and click on the Next
button.

-
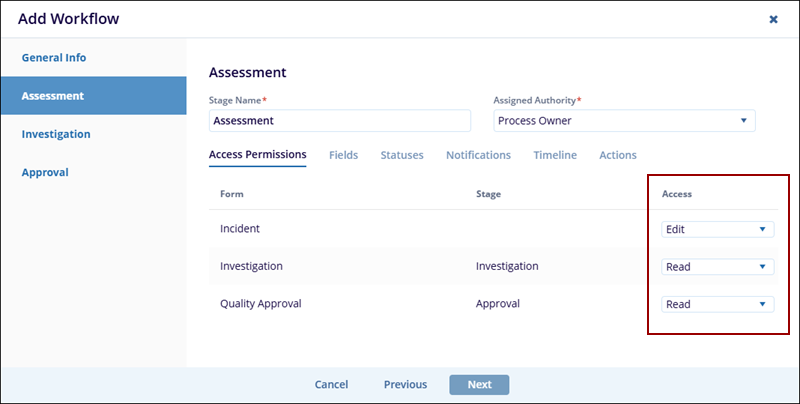
Within each stage of the workflow, access the following tabs and configure the necessary details.
- Access Permissions
- Fields
- Statuses
- Notifications
- Timeline
- Actions
Access Permissions
This tab allows Admins to define read/edit access for the assigned authority to the main form (e.g., Incident) and related forms (e.g., Investigation, QA) during the stage. These permissions define whether the assigned authority at a specific stage can view or modify the record, either within the current stage or across other stages, depending on the configuration.
To configure access permissions, follow the steps below.
- Use the ‘Access’ dropdown in this tab to select either ‘Read’ or ‘Edit’.
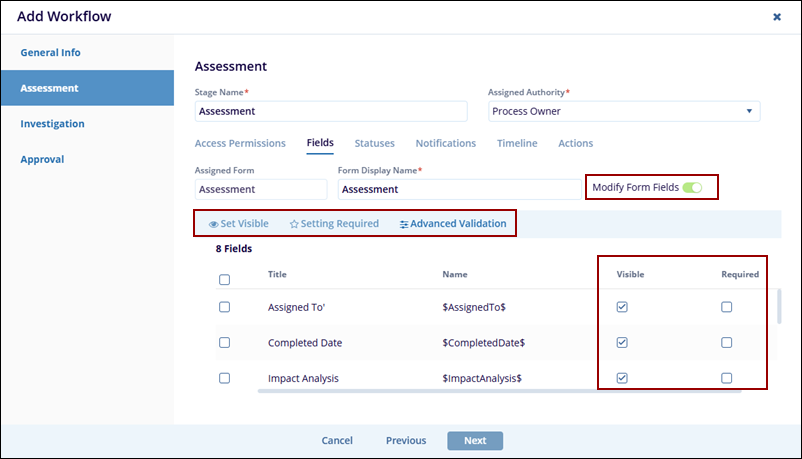
Fields
The Fields tab allows Admins to configure the display name of the form assigned to the stage and manage field visibility, Requiredness, and advanced validation.
To edit the form fields, follow the steps below
- Enable the ‘Modify Form Fields’ toggle switch.
- Once enabled, check or uncheck the ‘Visible’ or ‘Required’ checkbox to configure each field to be visible, required, or both.
- Select individual fields to update their visibility, mark them as setting required, or apply advanced validation rules.
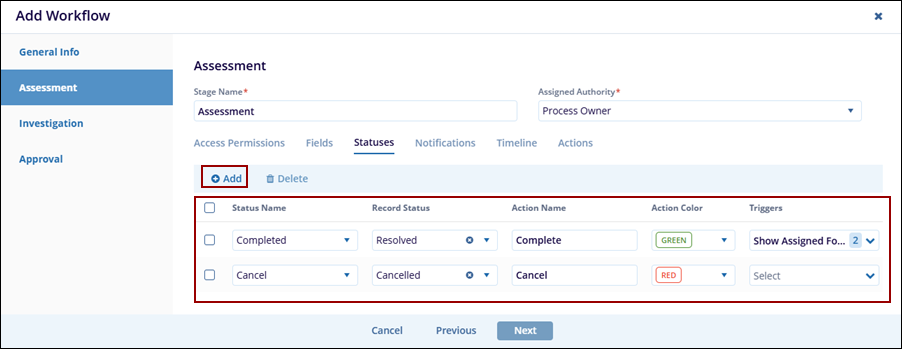
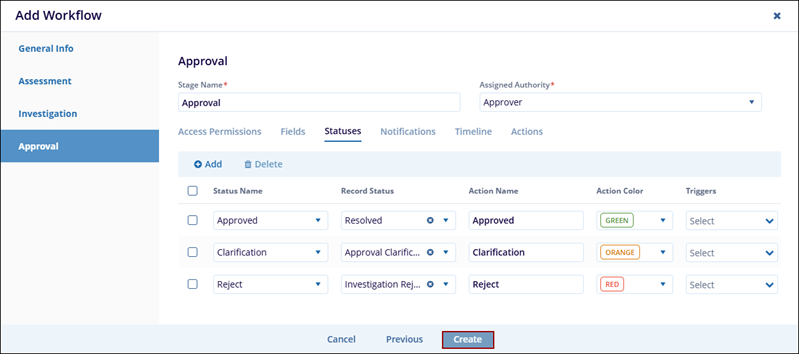
Statuses
The Statuses tab allows Admins to define the statuses that can be applied during a particular stage.
To configure the statuses, follow the steps below.
- Click the ‘+Add’ button to create the required number of status records.
- Choose a Status Name from the dropdown list, which displays options configured under the ‘Stage Statuses’ section.
- Select the appropriate Record Status from the dropdown, populated based on configurations in the ‘Record Statuses’ section.
- Enter an Action Name corresponding to the selected status. This name will appear as a clickable button in the record’s quick view panel.
- Choose an Action Color from the dropdown. The action button will display in the selected color.
- Select one or more Triggers from the dropdown.
When the action button is clicked, the associated trigger will
prompt the user to complete a specified action before the record
status is updated.
- Show Assigned Form: Displays the form assigned to this stage so the user can complete it.
- Show Additional Participants: Allows the user to assign additional contributors (from the team or outside) to help fulfill the responsibilities of the current stage.
- Provide Comment: Prompts the user to add a comment or explanation when setting the status.
- Send Clarification: Opens a modal to send a query/clarification request to another authority before proceeding.
- Pending Contributors: Shows the list of pending contributors.
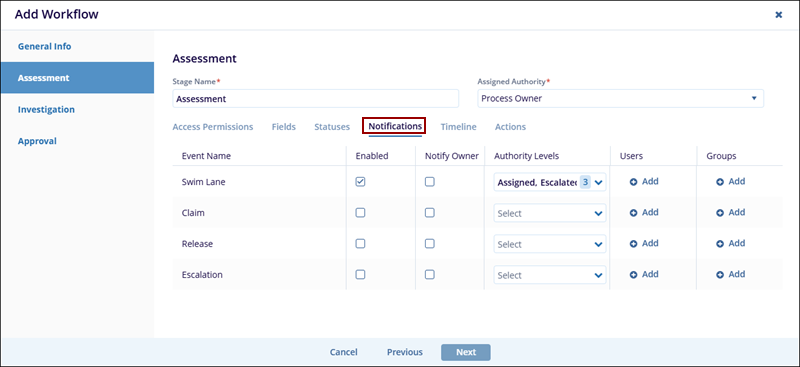
Notifications
The Notifications tab allows workflow creators to select users, groups, and authority levels who will receive the notifications and under what circumstances at a specific workflow stage for the following notification types.
- Swim Lane: Triggered when the record enters a stage, either by progressing to it or returning from a later stage. This notifies the relevant parties that their stage is now active.
- Claim: Sent when a user claims the stage to inform others that someone has taken ownership of the tasks for that stage.
- Release: Triggered when the record is released from the particular stage.
- Escalation: Triggered when the stage remains unclaimed or incomplete beyond the defined escalation period, alerting escalation-level users to intervene.
To configure the notifications, follow the steps below.
- Click on the ‘Enabled’ checkbox for the following events to enable sending the notification emails to the assigned users, authority types, and groups.
- Click on the ‘Notify Owner’ checkbox for each event to enable sending the notification emails to the record owners.
- Select the Authority Levels, i.e., Assigned, Escalated, and Informed, from the dropdown that should receive the notification.
- Add the additional users and groups who will review the record by clicking on the +Add button under the ‘Users’ or ‘Groups’ headers for each event name.
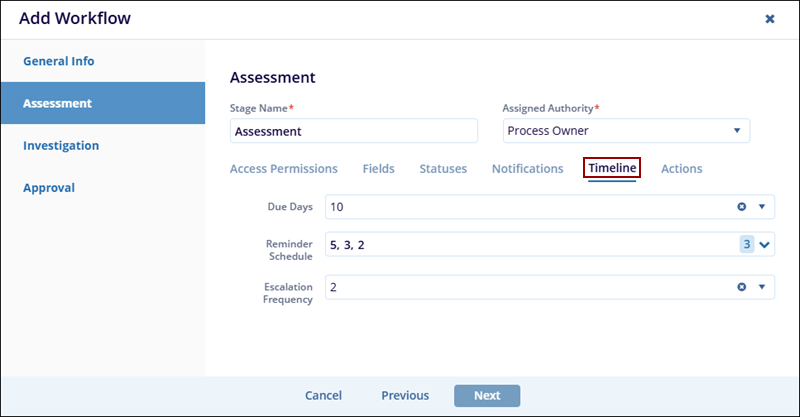
Timeline
The ‘Timeline’ tab allows users to define the due days, reminder schedule, and escalation frequency to ensure timely task execution and support automated follow-ups and escalations to maintain workflow efficiency and accountability.
- Due Days: Defines how many days the assignee has to complete the stage once it is initiated.
- Reminder Schedule: Defines the number of days after which, if no action is taken, the stage will escalate to the users assigned at the escalation level.
To configure the timelines, follow the steps below.
- Click on the ‘Due Days’ dropdown and select the number of days from the dropdown options.
- Click on the ‘Reminder Schedule’ dropdown and select one or multiple options.
- Click on the ‘Escalation Frequency’ and select an option from the available dropdown options.
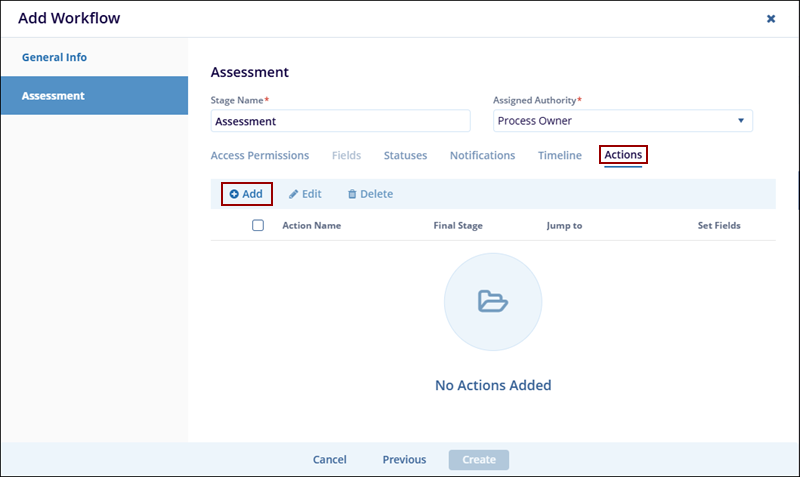
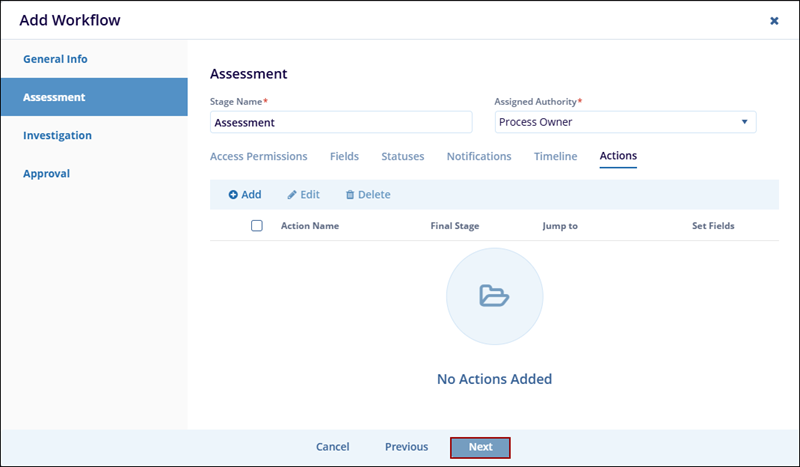
Actions :
The Actions tab enables the configuration of automated custom actions based on specific field values in the assigned form. These actions are triggered dynamically during stage processing to guide workflow logic or transitions.
Add Actions:
To add an action, follow the steps below.
- Click on the +Add button within the Actions tab.
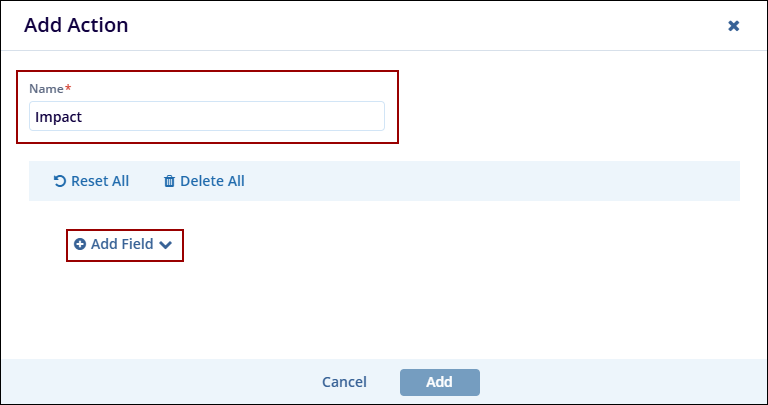
- On the Add Action modal window, provide a name to the action and click on the +Add Field button.
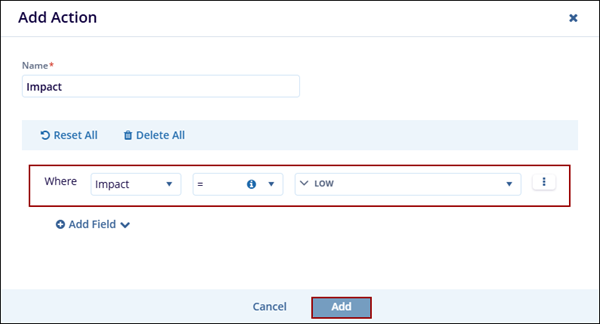
- Configure the condition by specifying the values and the logical operators, and click on the ‘Add’ button.
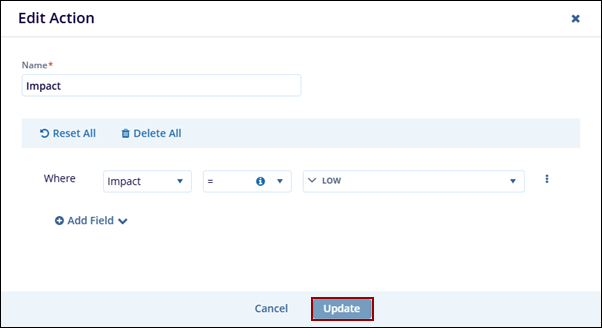
Edit Action
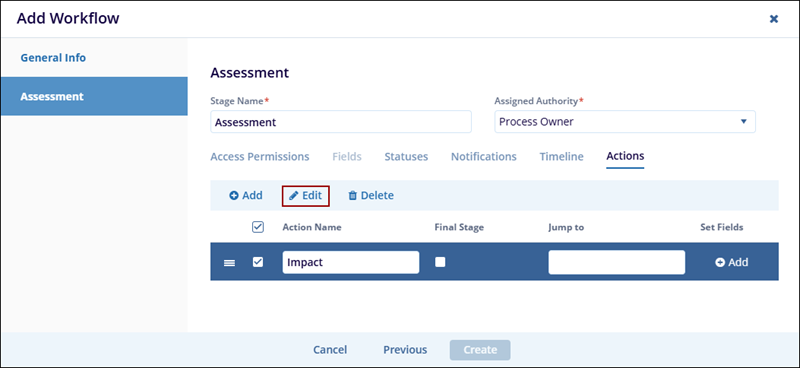
To edit an action, follow the steps below.
- Select an action and click on the ‘Edit’ button.
- On the ‘Edit Action’ window, make the required changes and click on the ‘Update’ button.
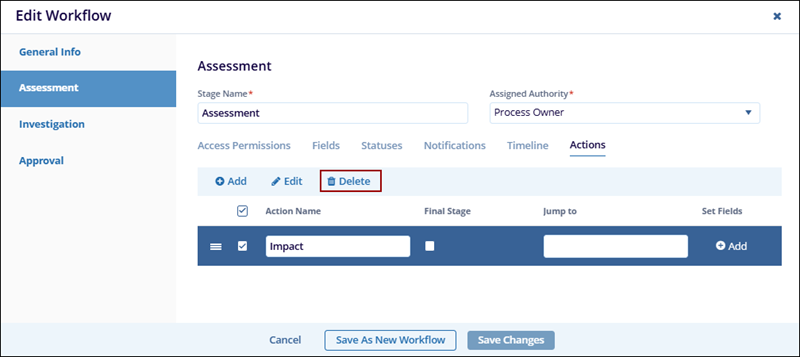
Delete Action
To delete an action, follow the steps below.
- Select an action and click on the ‘Delete’ button.
- Once the required details are added and configured in the first
stage, click on the ‘Next’ button to proceed to the
next stage and perform similar configurations until the last stage.
- Click on the ‘Create’ button once the details are configured in the last
stage.
TransPerfect’s Trial Interactive is an industry leader in practical, global eClinical innovation
PRODUCTS
 Linkedin
 X
X
Didn’t find what you need?
Our dedicated Project Management and Client Services team will be available to meet your needs
24 hours a day, 7 days a week.
Toll Free:
(888) 391-5111
help@trialinteractive.com
© 2025 Trial Interactive. All Rights Reserved
