General Settings
The General Settings for Sites describes the basic information regarding Site name and number, Address and Contact Details, etc. Explains about the Site statuses (e.g., Active, Pending, Closed) and transitions. Tracking essential regulatory documents, approvals, and certifications. Monitoring subject enrollment, site performance, and milestones. Defining user roles and access levels for site-related data and functionality.
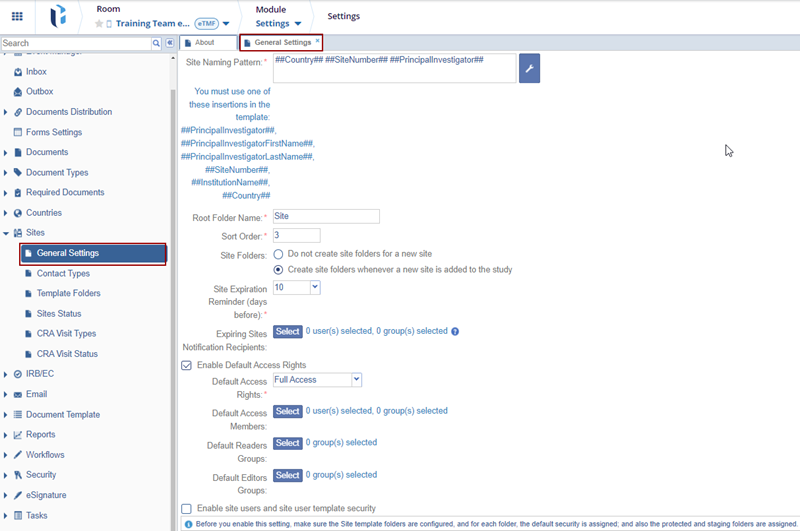
In order to set the general Site Settings, follow the instructions below:
- Click the Wrench icon to the right of the Site Naming Pattern box.

- An Auto Name Rules window opens.
- The ‘Site Naming Pattern’ is built and displayed in the Rule Editor box. The user can also type text into the Rule Editor.
- The information that populates in the ‘Insertion’ box is selected from the
list of Available Templates (Hardcoded and Functions).

- Click in the Rule Editor box.
- Double-click the insertions in the Available Templates box in the order in
which the user wants them to appear in the naming pattern.

- The Insertion Description displays the ‘Insertion’ and ‘Previewed as’ information.

- Once you have made the selections, click the blue box to the right of the Preview box to see how the folder names will appear in the room’s index.
- Once the naming pattern is set up correctly, click OK at the bottom of the window.

- In the next available field, enter the Root Folder Name. This title will be assigned to the main folder in the room’s index, which will contain subfolders for each investigative site involved in the study.
- Click in the field and type the root folder name.
- Selection of the Sort Order for the Site Management folder is made in the next field. This dictates where the folder appears in the room’s folder index.
- Click in the field and type the number order where it should appear in the index.

- The next area contains two radio buttons for Site folder creation in the eTMF. Click the option that fits the user's needs.
- The Site Expiration Reminder (days before) field offers a drop-down menu
where users can select the number of days before the expiration date to receive the reminder.


- The Expiring Sites Notification Recipients will receive a reminder notification when the site is about to expire.
- The Expiring Sites Notification Recipients pop-up window is displayed with the Users/Groups members.
- Select the users by double-clicking or dragging the entries to the right pane and click OK.
-
The Enable Default Access Rights have the following options that can be set as per the users requirements.
- The Default Access Rights: provides Full Access or View Only.
- The Default Access Members: when clicked on Select, the Default Access Members pop-up window is displayed with the Users/Groups members.
- The Default Readers Groups: when clicked on Select, the Default Readers Groups pop-up window is displayed with the Groups members.
- The Default Editors Groups: when clicked on Select, the Default Editor Groups pop-up window is displayed with the Groups members.

- The Enable site users and site user template security option is most typically enabled in eISF rooms where strict site security must be maintained. For additional information on these settings, please see the section on ‘Investigative Site Template Folders’.
-
Note: Before you enable this setting, make sure the Site template folders are configured, and for each folder, the default security is assigned; and also the protected and staging folders are assigned.
- Click Save after making any additions, selections, or changes in the General Settings panel.
 Linkedin
 X
X
