Inbox Settings
Explore Job Aids for more help:
Job Aids
The Inbox settings page within Room Settings allows users to configure options for the room’s email inbox, which is used to receive documents sent via email. Documents received through the email inbox are stored in a dedicated folder within the index structure.
Within the Inbox settings, users can configure the following settings:
- Inbox
- Start-Up Inbox
- Communication Inbox
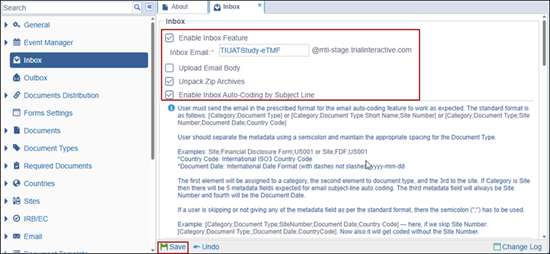
Inbox
- Select the ‘Enable Inbox Feature’ checkbox which activates the other options below.
- Check the ‘Upload Email Body’ checkbox to convert the body of incoming emails in the Inbox into PDF files.
- Select the ‘Unpack Zip-Archives’ checkbox to automatically extract files from attached zip folders in incoming emails.
- Check the ‘Enable Inbox Auto Coding by Subject Line’ checkbox to enable sending emails
to the room with subject lines formatted according to specific guidelines.Note: When the ‘Enable Inbox Auto-Coding by Subject Line’ checkbox is selected, the corresponding tooltip becomes active, providing users with specific guidelines for formatting subject lines.
- Enable the Check for and suppress duplicates by Hash Value’ setting to prevent duplicate publishing of email-converted documents by identifying and suppressing duplicates based on their hash value.
- Click Save once the settings are configured.
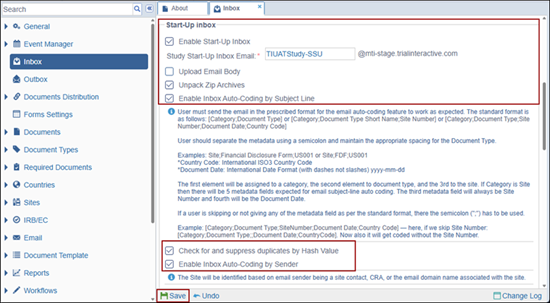
Start-Up Inbox
If the Study Start-Up module is enabled for the room, users can configure the settings related to the start-up inbox.
- Select the ‘Enable Inbox Feature’ checkbox which activates the other options below.
- Check the ‘Upload Email Body’ checkbox to convert the body of incoming emails in the Inbox into PDF files.
- Select the ‘Unpack Zip-Archives’ checkbox to automatically extract files from attached zip folders in incoming emails.
- Check the ‘Enable Inbox Auto Coding by Subject Line’ checkbox to enable sending emails to the room with subject lines formatted according to specific guidelines.
- Enable the "Check for and suppress duplicates by Hash Value" setting to prevent duplicate publishing of email-converted documents by identifying and suppressing duplicates based on their hash value.
- Check the ‘Enable the Auto-Coding by Sender’ checkbox.
- Click Save once the settings are configured.
Communication Inbox Options
The Communication Inbox is a centralized section where study-related communications are organized and managed. This inbox allows users to review and classify communications for their relevance to the study. Communications are automatically converted into PDF format upon receipt and displayed in a tabular format.
- Check the ‘Enable Communication Inbox’ by checking the checkbox, allowing room participants to receive the trial documents.
- Select the ‘Set Incoming Documents as Final’ checkbox to mark the documents as final received within the communication inbox.
- Check the ‘Check for and suppress duplicates by Hash Value’ checkbox to prevent duplicate publishing of email-converted documents by identifying and suppressing duplicates based on their hash value.
- Check the ‘Upload Email Body’ checkbox to convert the body of incoming emails in the Inbox into PDF files.
- Select the ‘Do not convert MSG file format to PDF’ option to prevent the conversion of received emails in MSG format to PDF.
- Check the ‘Merge Attachments checkbox to combine all attachments received in the email into a single document.
- Select the ‘Unpack Zip-Archives’ option to automatically extract files from attached zip folders in incoming emails.
- Check the ‘Enable Inbox Auto Coding by Subject Line’ checkbox to enable sending emails
to the room with subject lines formatted according to specific guidelines.
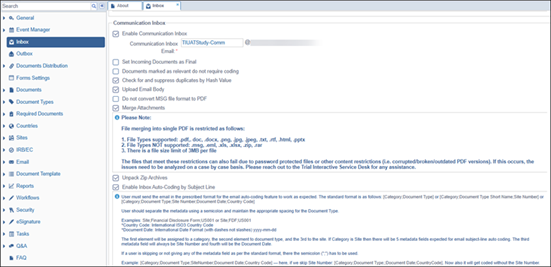
- In addition, users can enable the following features for the Inbox:
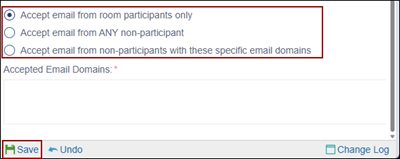
- Accept email from room participants only: When enabled, only emails from registered room participants are accepted.
- Accept email from ANY non-participant: When enabled, this option allows emails from any sender, regardless of their participation status in the room.
- Accept emails from non-participants with these specific email domains: When enabled, the room administrator can specify permitted email domains, allowing only emails from those domains.
- Click ‘Save’ once the communication inbox settings are configured.
- Click the Change Log option, located at the bottom right of the screen to view the change log history for the Inbox settings.

 Linkedin
 X
X
