Sites Management
Explore Job Aids for more help:
Job Aids
This section provides detailed instructions on adding, deleting, importing, and exporting data, performing mass coding, managing security settings, and customizing columns. It also includes comprehensive guidance on General Information, Contacts, and Site Visits.
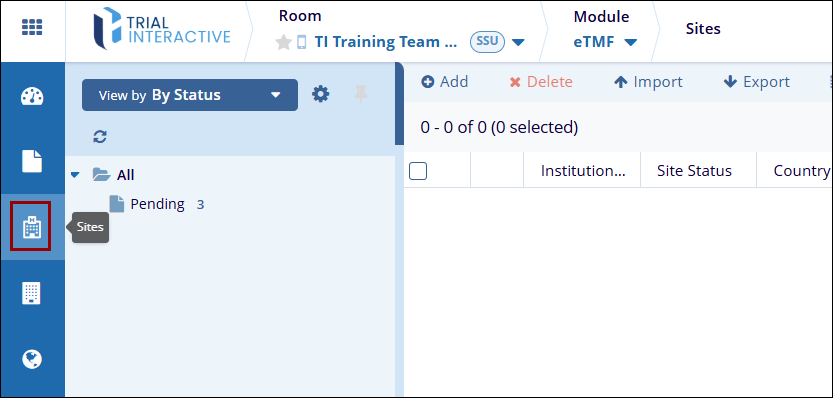
To access the Sites modal in eTMF, follow the steps below.
- Select the eTMF module from the Module dropdown.
- Click on the Sites modal from the left-hand navigation menu.

To add new sites, follow the steps below.
- Click on the Sites modal from the left-hand navigation pane within the eTMF module.
- Click the +Add button to create a new site. This opens the New Site form.

-
In the General Info tab, expand the following sections and add the necessary information.
Info: Add information to the following fields.
- Institution Name*: Mandatory add the institution name from available options.
- CRA: Select users from the dropdown options as CRAs
- Start-Up Specialist: Select users from the dropdown options as Start-Up Specialists.
- Site Number: Enter the site number.
- Site*: Mandatorily enter the site name if Disable auto Site Name is disabled.
- Disable auto Site Name: Check the checkbox to manually add the site name or vice versa.
- Reason for not using the auto site name: Mandatorily provide a reason for
not using the site if Disable auto Site Name is disabled.

- Address: Add information to the following fields.

- Country: Select a country from the dropdown options.
- Website: Add a website
- Address: Add the address to the respective field
- City: Enter a city for the site
- State: Enter a state for the site
- Zip Code: Enter the ZIP Code for the site
- Phone: Enter phone number for the site
- Fax: Enter the fax number for the site
- Geo Code: Enter the geocode for the site.
-
More: Add information to the following fields.
- Once the necessary details are specified, click on the Add button.

- On the Contacts tab, perform the following to configure the list of contacts
within the site.

-
Add Contacts: To add contacts, follow the steps below.
- On the Contacts tab, click on the +Add button.
- On the Add Contact form, add details to the mandatory metadata fields.
- Click on the Finish button.
- To add existing contact, switch to the Add Existing tab.

-
Edit Contact: To edit a contact, follow the steps below.
- Select the contact within the contacts list.
- Click on the Edit button from the top menu bar.
- On the Edit Contacts screen, make the necessary changes.
- Once the details are modified, click on the Edit button at
the bottom of the Edit Contacts screen.

-
Delete Contact: To a contact, follow the steps below.
- Select the contact within the contacts list.
- Click on the Delete button from the top menu bar.

- De-activate Contact: To deactivate a contact, follow the steps
below.
- Select the contact within the contacts list.
- Click on the De-activate button from the top menu bar.

-
Activate Contact: To activate the contact, follow the steps below.
- Select the contact within the contacts list.
- To activate, the contact, click on the Activate button from
the top menu bar.

-
Convert to User: To convert a contact into a user, follow the steps below.
- Select the contact within the contacts list.
- Click on the Convert to User button from the top menu bar.
- On the Convert Select Site Contacts screen, provide a role and the
actions to the user and click on the Convert Contact to Room
User button.

-
- Once the General Info and Contact Details are added, click on the Add button.
To delete a site, follow the steps below.
- On the Sites screen, check the box next to the site to delete,
- Click on the Delete button.

-
On the Delete Site(s) dialog, enter the reason for deletion in the provided field. Optionally, select Delete reconciliation data or Remove Site from Audit Configuration if applicable.
- Click the Delete button to confirm the deletion.

step-by-step guide for importing sites in the eTMF module:
- On the Sites screen, click the Import button from the top menu bar.

- On the Sites Import dialog, click on the See the sample worksheet template to download a template and enter the necessary details.
- Click Select to upload a metadata file in .xlsx format. Ensure that
the spreadsheet contains two worksheets.
- The first worksheet should list investigative site details.
- The second worksheet should list contacts.

- After selecting the file, click Next to proceed with the import process.
To manage security settings for sites, follow the steps below.
- Check the box next to the site to manage security settings.
- Click on the Manage Security button at the top of the screen, and choose
either Editors or Readers to manage permissions.

- In the Security - Editors or Security - Readers dialog, switch to the Users or
Groups tab.
Select the user(s) or group (s) by checking the box next to their name in the user list and add them to the Selected Members section.
- Click on the OK button.

- On the Security Update Options popup, select the options by clicking on their
respective radio buttons.
- Source
- Selected Sites
- All Sites In The Current Grid
- All Sites In The Room
- Options
- Append New Security Members
- Replace Current Security Members
- Source
- Once the necessary, click on the Append (for append new security members) or Replace
(for replace current security members) button.
