eTMF Dashboard

Explore Job Aids for more help:

Job Aids

The eTMF (Electronic Trial Master File) dashboard provides a visual representation of trial-related document health and status. The eTMF ensures that clinical trial documents are easily accessible, properly stored, and secure.

eTMF Health

The eTMF Health tab provides an overview of the overall health and progress of the trial master file. It helps monitor the completeness and compliance of documents in different stages of the clinical trial by visualizing key metrics such as the percentage of completed documents in categories such as Trial, Country, Investigative Site, and overall.

Steps to view ETMF Health:

  1. Navigate to the eTMF dashboard, and click on the eTMF Health tab.
  2. By default, the eTMF Health tab is selected and the user can view the eTMF Health Chart through the Donut, Bar, and Column view by selecting it.
  3. To export the displayed data, click Export, which allows the user to download the information for further analysis.


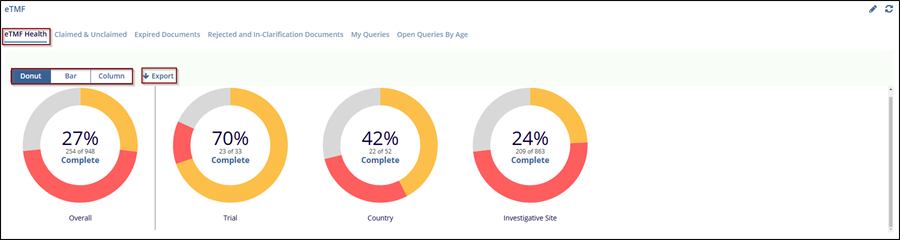
  4. Once clicked on the Export chart window will be a popup and the user can export the data in – Image, Excel, or Clipboard format


Claimed & Unclaimed

In the eTMF dashboard, Claimed & Unclaimed refer to the status of documents, who is responsible for them, or who has taken action on them.

Steps to View Claimed & Unclaimed Documents:

  1. Navigate to the eTMF dashboard and click on the Claimed & Unclaimed tab.
  2. The Claimed & Unclaimed tabs selected and the user can view the Claimed & Unclaimed Chart through the Donut, Bar, and Column view by selecting it.
  3. Use the dropdown on the right to filter the documents by their workflow stage, such as 2-Step Workflow.
  4. To export the displayed data, click Export, which allows the user to download the information for further analysis.


Expired Documents

The Expired Documents tab, lists documents that are either expiring or already expired, based on the specified expiration period. The Expired Document tab allows users to track these documents, monitor their expiration, and take action.

Steps to manage Expired documents by replacing them with updated versions:

  1. Navigate to the eTMF dashboard, and select the Expired Document tab.
  2. The user can apply the Filter to view Expired or Expiring documents. Select the option to focus on documents that are already expired or those approaching expiration.
  3. Check the Checkbox next to the Blue arrow and click the +Add New Version button at the top-right of the dashboard.


  4. This will open the new Add New Version window and select the appropriate option.


  5. The options available are configurable by the room administrator in the Settings area.
  6. If Replace the Attachment is chosen, click the Browse button and locate the new version of the file.
  7. Set the new Expiration date, and give the Reason for the replacement in the comment box.
  8. If the ‘A new version was already submitted. Remove this document from the list. Nothing else needs to be done. The document will be removed from the list of expiring documents.
  9. Press Save to save the changes or click Cancel to discard the changes.


  10. Select the required and appropriate Checkboxes from the Submitted name option to select the document, next to the checkboxes, the user can click on the blue arrow (Go to the document), which will navigate to the document index.
  11. Click on the PDF icon will open a new window, The PDF opens in the window, allowing the user to navigate through the pages using the controls at the top (e.g., Print, download, page navigation arrows, zoom options, full page, turn page, search Icon, image processing menu, show and hide).


  12. Click on the Export Documents Metadata button, and a new window will pop up with 2 options:
    • Export option and Select Metadata fields.
  13. Select the Export option will give 2 sources:
  14. Selected records: Choose this option to export metadata only for specific selected documents.
  15. All documents in the current grid: Choose this option to export metadata for all documents currently displayed in the grid.


  16. Click Next to proceed to Select Metadata Fields, where the user can choose the Metadata fields to include in the export.
  17. The user can use the Sort By dropdown to sort the available metadata fields alphabetically or logically.
  18. Click Export to download the document metadata file in the preferred format, if the user wishes to go back click on the Previous button or click Cancel to discard the changes


The Rejected and In-Clarification Documents tab displays documents that have either been rejected or are currently in a state requiring clarification. These documents may need to be reviewed, corrected, and resubmitted before they can be approved and processed further in the workflow. This overview helps identify common reasons for rejection and areas where clarification is frequently needed.

Steps to Manage Rejected and In-Clarification Documents:

  1. Navigate to the eTMF dashboard, and select the Expired Document tab to view the list of documents associated with a specific rejection or clarification reason.
  2. Click on the + sign next to the reason will expand the section, and reveal individual documents, including details such as the Submitted Name, Created Date, and Comments.
  3. Click on the – sign will minimize the section.
  4. Additional options, like Export and Manage Columns, allow the user to export the data or customize the column view to focus on relevant information.


The Open Queries by Age tab displays documents that are older than 30 days or more. and provides a document count for easy tracking. The user can select a query type from the dropdown menu located at the top left, including Any, Workflow, or Audit options.

Steps to open queries by age:

  1. Navigate to the eTMF dashboard, and select the Open Queries by Age tab.
  2. Use the Query Type dropdown to filter the queries:
    • Select Any to view all queries.
    • Choose Workflow to see the action related to a specific workflow process.
    • Choose Audit to show only those that are related to audit activities.
  3. Review the list of documents displayed with their details (e.g., Submitted Name)
  4. Click on the + sign next to the reason will expand the section, and reveal individual documents, including details such as the Submitted Name, Created Date, and Comments.
  5. Click on the – sign will minimize the section.
  6. Additional options, like Export and Manage Columns, allow the user to export the data or customize the column view to focus on relevant information.