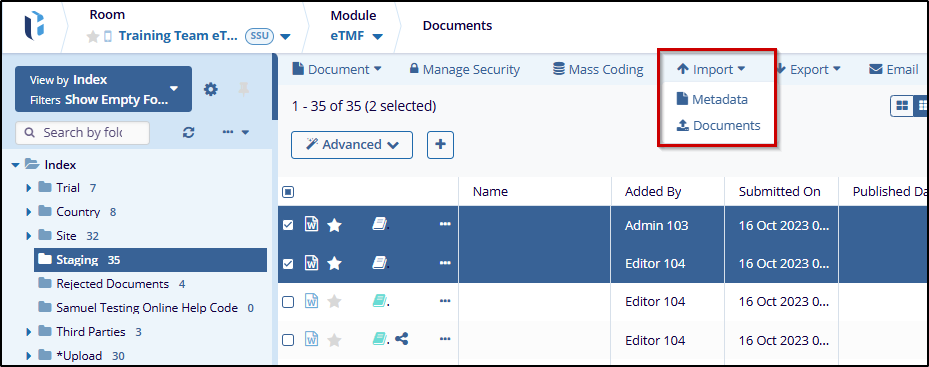
Import
Explore Videos for more help:
Videos
The Import function allows users to bring documents into the room, where permissible, the function also allows for the import of metadata and documents. If the user has selected a specific target folder in the index pane, the import window will populate with appropriate metadata in anticipation of that folder being the desired final location of the document.
Documents
To import documents, follow the steps below:
- Click on the Import button from the top menu bar and select
Documents.This opens the Import Documents window.

- On the Import Documents window, add single or multiple documents using the drag
& drop functionality or manually upload the documents by selecting Browse File
or Browse Folders.

- Once the documents are uploaded, add the necessary information in the Fill Metadata tab.
-
Select the following checkboxes
- Unpack Zip Archives: Enable this option if a ZIP folder is uploaded and the documents within the ZIP folder need to be uploaded as separate documents.
- Convert Non-PDF files to PDF: Enable this option to convert any file format
into PDF files.

- If metadata fields are not added, navigate to the Assign Placeholders tab and drag
& drop the placeholders within the designated area.Note: If Category, Country and Document Type is selected within the Fill Metadata tab the Assign Placeholders tab will display the placeholders by default.

- Click on the Import All & Apply Metadata button once the metadata fields
are updated or the placeholders are assigned.

Metadata
The Metadata Import option allows users to import metadata associated with documents, such as document type, category, country, or other key data. It enables the system to update or create metadata records in bulk, ensuring that documents are properly categorized and searchable.
To import the metadata, follow the steps below:
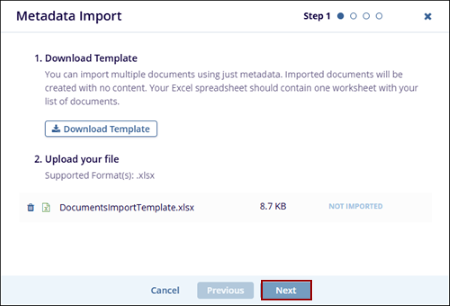
- Click on the Import button, and select the Metadata option. The Metadata Import window opens.
- In the Metadata Imports window, click on Download Template to get a pre-formatted file that contains the required metadata fields.
- Open the downloaded template and fill in the necessary details as per the systems guidelines.
- Under the Upload Your File section, locate the Browse button. Click Browse to open the file explorer.
- Select the appropriate file or folder containing the metadata information.
- Once selected, the system will display the chosen file. Click Next to
proceed.
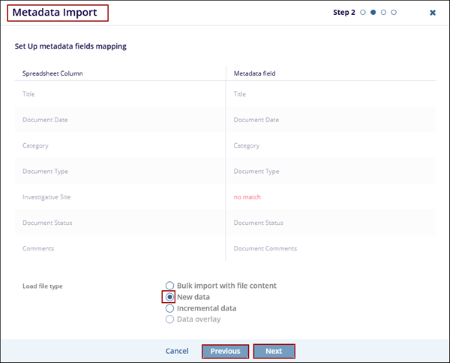
- The system displays a Metadata Fields Mapping screen, ensuring that each column from the uploaded file is correctly mapped to the systems metadata fields.
- Once the mapping is correctly set, click Next to proceed. If any errors are detected, click on the Previous button and go back to correct them.
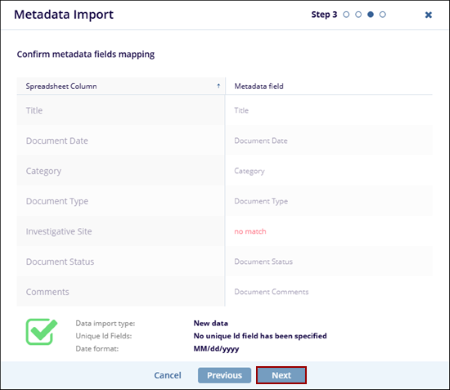
- Once confirmed, proceed by clicking Next to Import the data.
- Confirm whether the metadata field mapping is accurate and click on the Next
button.
- Click OK to View the results.

 Linkedin
 X
X
