Document Activities Menu

Explore Job Aids for more help:

Job Aids

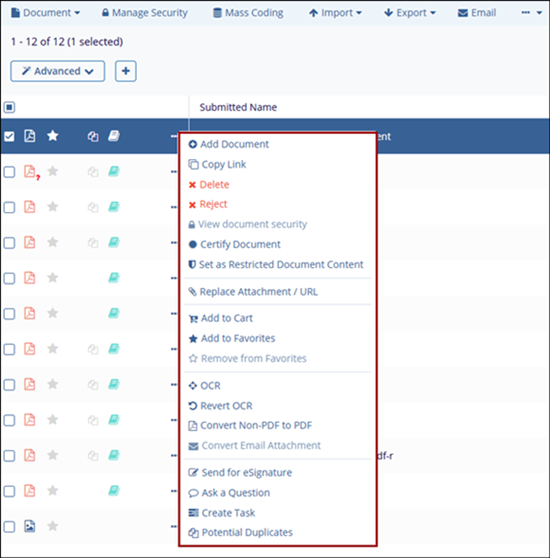
The Document Activities Menu provides access to various actions based on the user’s access rights. To open this menu, select a document or placeholder from the Grid and either right-click or click on the three-dot menu.

Note: The view displayed above is that of a Room Administrator. The options available will vary based on the individual user access rights.


Add Document

Users with sufficient access (editors and above) can open the Document Activities Menu and select the Add Document option. In locations within Trial Interactive where this is an option, the system will open an import interface that will apply the coding relevant to the placeholder so that the document can be added to the system pre-coded.

To add a document, follow the steps below:

  1. Click on the three-dot menu and select the +Add document option.


  2. On the New Document form, select the whether the uploaded file will be a File or URL.
  3. Click on the Browse button and select a file to upload.
  4. Fill in all the mandatory metadata fields highlighted with red asterisk (*) mark.
  5. Click on the Finish button once all the details are added.


  6. Configure the Access and Security and click on the Finish button.


Copy Link

If referencing a specific document to another room user for review, the Document ID Number can be provided or the Document Activities menu can be opened to select Copy Link, which will copy a direct URL link to the clipboard. Anyone using the link must have sufficient access to the study room in order to view the document.

To copy link, follow the steps below:

  1. Select a document by clicking on the checkbox.
  2. Select the Copy Link option.


Delete Documents

Administrator-level users can select Delete from the Document Activities menu for any document in the room, except those currently claimed for review in an Audit Response or the QC Workflow. Editor and Manager-level users can delete documents only if they uploaded the document and it has not been claimed by the QC workflow. Once a document is marked as final, Editor and Manager-level users cannot delete it unless additional permissions are granted.

To delete documents, follow the steps below:

  1. Select a document and click on the Delete button from the document activities menu.


  2. Enter the reason for deletion on the confirmation popup and click on the Delete button.


  3. Deleted documents can be viewed in the Deleted Documents section of the Documents module, which is accessible only to Administrators.


Reject Documents

A new setting is added to support a Rejected folder within the eTMF for Room Administrators, and a new Document Rejection function is now available to Admins, Document Managers, and Room Managers. Any documents in Upload, Inbox, Staging, and Rejected Folders are not considered to be Final. A Reason for Rejection dropdown is now available for workflow documents and documents in the rejected folder/status are now excluded from eTMF health calculations.

To reject a document, follow the steps below:

  1. Select a document by clicking on the checkbox.
  2. Right-click on the document or the three-dot menu in the grid and select the Reject option from the document actions menu.


  3. Provide a rejection reason on the Reject Document popup and click on the Reject button.


Note:
  • Users will not be able to drag and drop documents into this folder to prevent awarding an erroneous status should a non-rejected document be placed in this folder.
  • To reject a document outside of the standard workflow steps, the user must either be an administrator or must have the Document Manager action enabled on their user account.